

How To Fix Kumi Cretor Jam Spools
Fifty-fifty though I'g a hand braider, I've always been fascinated by braiding machines and their history. The antique hand-crank braiding automobile in my photos below was on display at Paradise Mills, the old Macclesfield silk weaving mill we toured at Braids 2012 in the U.K. This was the oldest braiding car I'd e'er heard of – from the early 1800's – and I got to crank it in person! It didn't occur to me at the time, simply from the peak of the crank, I now wonder if this motorcar was meant to be worked by child laborers – if and then information technology'south a poignant contrast to the toy I review further down.


(*Leap to braiding auto history and resource list here)
Videos
I honey watching youtube videos of braiding machines in action – from antique to high-tech:
(Click your back push to render hither from linked youtube pages)
Antique
ane.five min video of lovingly refurbished New England Barrel Co. braiding machines in action (circular braider circa 1960, apartment braider circa 1920, apartment braider 1880's). Great closeups of braids, and machine parts in action.
Beneath are some links to video clips of the gorgeous, intricate, antiquarian braiding machines and braids at la Maison des Tresses et Lacets – the braiding machines at this still-functioning braid factory in France were originally water-wheel-powered!:
ane-infinitesimal video prune of two of their braiding machines at work, the start 1 making a flat complect, and the second one making what I call back is a tubular braid (diamond patterns in orangish and blue).
Ii more videos well-nigh this amazing factory that prove the waterwheel, also machines braiding unusually shaped decorative braids: 2.five minutes, No vox-over; and 5 minutes, with French narration
Modernistic:
Elementary modern braiding motorcar, non also different from the antiquarian machines except in speed, 1-minute video
Aviation composite braiding (ultra-hi-tech factory in the netherlands, same basic idea, only horizontal, and braiding around a solid core): 3-minute video (a fun one! You lot have to skip one advertizing in the offset, but it's worth information technology.)
BIGGEST, most humongous ever (this link cuts to the middle of a long corporate brag in German language to the best part): About i infinitesimal (from v:xviii to 6:28). These enormous ropes are square braids – I think of 10 strands. About exactly like a five-loop fingerloop braid!
Hi-tech:
Makiko Tada's amazing braiding machines for composite fiber industrial braids, I think these intricate tracks are forming integrated multiples of square braids – 1-infinitesimal video
Toy:
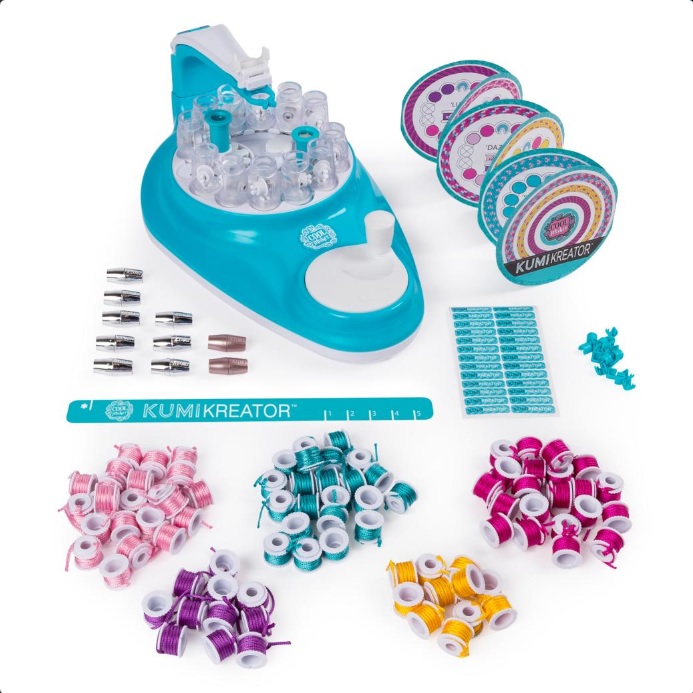
Lo and behold a toy hand-crank braiding machine recently came out that was brought to my attending on the Braids and Bands word group – made by Spinmaster, called the Cool Maker KumiKreator Friendship Bracelet Maker (I am non beingness paid for this review btw, or for any clicks on links within information technology, and in fact I advise using this product in means the manufacturer does not recommend.)
Almost online reviews of Spinmaster'south KumiKreator and ii-in-1 Kumikreator are by parents who received a gratis Kumi kreator in render for their review, or are getting revenue from clicks on product links within their site. At that place are also some reviews past disgruntled parents who didn't take the patience to go through the instructions slowly and carefully, and are dismayed when the machine jams upwardly because they loaded it incorrect (see Notes and Tips below). I am a hand braider, not a parent, and I bought this to apply myself. I have taught both preschool and elementary school though, so I exercise have some insight into what would be difficult or easy for children in using this toy. Almost all children will need adult assistance at first, but if they are ix or older they will probably be able to apply information technology on their own after some practice.
Children 8 and under will demand adult help in setting up the bobbins for braiding; and as well in putting the clasps onto the ends subsequently the braiding is done. The bodily cranking of the handle to produce the braid is the easiest part, still takes some co-ordination and attempt, I imagine any child would experience very proud and productive cranking hard and watching a braid course. Teenagers and adults will feel the fascination and reward of watching a simple cranking motion produce in a few minutes what would take a good half-hour or more (every bit well every bit a lot of practice beforehand) to braid by manus.
Finishing the braid with the included record and plastic clasps is much simpler than standard methods of finishing braided jewelry, considering there are no knots to tie, or glue to fuss over. The clasps seem surprisingly secure, but they are not easy to open and close, most kids will probably prefer to roll their bracelets on and off.
All children will need adult aid in learning how to use the machine, and the adult needs to be willing to read (or lookout the video) and advisedly follow the directions for each step of the gear up-up. Speaking for myself, I couldn't catch them all just by a quick scan-through of the directions, or a quick picket-through of the video. I had to refer to them step-by-footstep during the starting time set-upwards – ie pausing the video to perform each stride. The steps are non hard to practice, or to remember later, just each one is important for the KumiKreator to operate correctly. See my Notes and Tips below for troubleshooting if a jam or other problem occurs.
Details:
The Kumikreator seems to be priced effectually $17-25. I don't have links to sellers here, but you can detect information technology some craft and 'big-box' stores, as well as online. It is sturdy plastic. I have subjected mine to fairly heavy utilise without annihilation wearing out (yet). According to another review, the then-called ii-in-one KumiKreator is the exact same product, merely in a different color (purple), and comes with some spools of thinner thread besides as spools of the original thicker thread. The thinner thread is a longer length, so can make thinner, longer braids – long plenty for a brusk necklace. (see tips below for using your own thread for even longer braids.)
This KumiKreator toy is an actual braiding machine, only with a very different mechanism from that of a standard "horn gear" braiding machine (compared in footnotes*). It produces a strong, round, intricate braid that is a common type of manus-worked Kumihimo braid, but is uncommon to non-existant as a factory-made complect. The Japanese proper name for this braid-class is Kongoh-gumi meaning house, round braid. Kongoh braids are typically made by hand, either on a circular wooden braiding stand up called a marudai, or on a strong slotted bill of fare or foam disk.
(Btw: the braids in photo below are sorta 'hacked' – the automobile and its included spools make braids more like the magenta/blueish/orange bracelet in photos further downwardly.)
This car braids eight- or 12-strand Kongoh braids. 12 strands is equivalent to a half-dozen-loop fingerloop braid, merely most Kongoh color-patterns are quite dissimilar from those of the loop braids I teach on this blog, so I am finding them very fun to brand! All samples in photos (with the exception of one bracelet) are 12-strand braids in my own thread: cotton fiber embroidery floss and crochet thread, and wool, silk, or linen thin weaving and knitting yarns. Ane of the two finished bracelets (photo further down) is 8-strand, fabricated with the included KumiKreator constructed thread and plastic clasp.

Left-to-right, from lower left corner: 1st braid is the thickest, crochet cotton #three (iii-ply); braids two-5 are fine weaving wool (discontinued brand); 6-12 are dmc embroidery floss. (#9 and #11 have a single spool of pink rayon thread)
I've never come beyond a machine-made braid like this – significant a round complect that is dense and meaty in itself, rather than tubular around a core. (The fingerloop braid I phone call the Spiral Complect is similar – the strands all pass through the heart, creating a dense, circular braid.)
When y'all plow the crank of the KumiKreator braiding machine, the spool-holders don't all circulate simultaneously the style they practise in an industrial horn-gear braiding machine. Instead, just two spool-holders move at a time while the other spool-holders wait in slots around the round face up of the machine. The machine has two spool-moving gears. Each gear picks up and moves one spool-holder, moving them (in reverse directions) to a vacant slot across the circular face up of the car. In the photograph beneath, the two vacant slots are at the elevation and lesser of the machine (left and right in the photograph), but as you crank, two spool-holders will move into those vacant slots, leaving two other slots vacant, and so on.

The action is fast and clattery, not very pleasant for others in the vicinity. (But somehow non bothersome at all to the obsessed braider doing the cranking!) The growing braid is drawn up by the white spring-loaded arm at the top of the machine.
This toy braiding car is targeted toward young girls making friendship bracelets, and the manufacturer (Spin Master) wants to continue them all buying packs of replacement spools, in different color-assortments with enticing names. They strongly propose just using this thread, vaguely threatening disaster if yous cartel to use your ain thread. The spools are Modest, and the thread is thick. Each spool holds only xx″ of this thick, braided synthetic thread, enough for i bracelet-length braid – which will use upward 8 or 12 spools:

When you purchase the machine information technology appears to come with a huge supply of spools of thread, but since 8 to 12 of them get used up for each bracelet, they run out fast! If your kid is hooked, s/he will be clamoring for replacement packs very rapidly. These are not cheap – I doubtable that the replacement packs are intended to be a chief acquirement stream for this product.
Luckily, it'due south no trouble to reload these spools with your own thread. I'm pretty sure that children over 9 can learn to practice this too. There'due south a handy slot/groove inside the spool at ane terminate which grips the starting twist or two of the thread every bit you air current. With effectively thread y'all tin can make much longer (and finer) braids. So far I've used fine weaving wool, #3 crochet cotton, and embroidery floss:

Of these threads, the size 3 crochet cotton (big purple ball in back above) is probably the easiest and most rewarding for a kid to use. The bracelet comes out a chip thinner than with the Kumikreator thread, but still quite hefty, run across comparison below – the 12-spool cotton bracelet ended up about the aforementioned size as an eight-spool Kumi-thread bracelet:

Two bracelets for comparison. Left bracelet was made with size 3 crochet cotton wool that I wound onto empty KumiKreator spools (12 spools). Correct bracelet is an 8-spool bracelet fabricated with the KumiKreator synthetic thread. Both accept the Kumikreator plastic clasps, which come in ii colors. Piece of cake to attach (no gluing) but difficult to employ – they are hard to snap and unsnap. In a youtube video, I saw ane kid but rolling her bracelet onto her wrist without using the squeeze.
Children nine or nether might be able to learn how to air current thread onto a spool, but may non have the patience to load 8 to 12 of them. Their main problem with winding might exist enthusiastic overwinding – winding so much on that the bulging spool won't fit easily into the auto's trivial bobbin-carriers, which would cause problems when cranking out the braid.
The spools don't take a lot of room for thread, but if I wind neatly, I can load 3 yards of embroidery floss onto each spool, for a complect of about half that length – almost 5 feet. This is more than enough length for a necklace, or could exist a drawstring or a handle for a pocketbook, shoelaces, pet leash, etc. Winding onto twelve trivial spools takes patience, only the payoff is cranking out a long pretty little braid, clickety-clack!
Note: Run into tips from readers below about using a drill to load thread into the spools!
Note: Hither'south a link to another review of the Kumikreator, on a weaving/ braiding site. Information technology has some great insights and useful closeup shots – similar 1 of the bobbin showing the little groove that tin can grip the beginning of the thread when you commencement filling the bobbin.
I besides tried using a fine slippery rayon, doubled, but that really was a nearly-disaster! Fifty-fifty at merely one spool among 11 well-behaved spools of cotton embroidery floss – the doubled rayon thread kept slipping off its spool and tying up the works. Perchance doubling it was the problem – I'll try to find a thicker rayon thread and try that. [update: I've now tried both silk and linen – both turned out great. The linen looked disappointing until I washed it – improved it 100%, and information technology feels amazing, like quicksilver.]

(above) Silk – cobweb weight spun silk, tripled (3 ends per spool).
(below) Linen

The spiral-blueprint braid in the photograph beneath is just under 5 feet in length (all these braids are cotton embroidery floss).

Update: Braids can be up to twice that length if each finish is braided separately. My test braid beneath turned out nearly 3 yards long (ix feet/ 2.74m), and might have been a lot longer if one spool hadn't run out of thread annoyingly sooner than all the others. I cutting 6 yds of embroidery floss for each spool, but wound only 3yds onto the spool, leaving the extra iii yds hanging (actually, after loading the Kumikreator from the centerpoint of the strands, I then arranged those loose ends up temporarily so they wouldn't tangle). I started braiding at the mid-bespeak of each strand, working down to the end of the strands on the spools. When I finished cranking out that get-go half, I and then wound the opposite ends of the threads onto the emptied spools – but only after first threading each strand downwards through a spool-holder of the car – this is crucially important, because on this 2nd half of the braid, y'all won't be able to load the automobile after winding the spools – I establish this out the hard style! I tightened the spools well to avert looseness at the 'join', and so braided the other half of the warp. It's hard to predict exactly how long the complect will turn out, because oftentimes one spool will run out of thread long before the others even though they all started with approximately the same length – this is very puzzling!

Color Patterns:
A pocket-size circular pattern booklet comes with the machine (upper right in production photo, and sample pattern page shown beneath). There are other pattern books bachelor for complimentary online. Most of the patterns are for viii-strand braids, just a few are for the full 12 spools. I love the blueprint they call 'Dream Beam,' shown on the design booklet page below. Information technology's the color-pattern of the lowest braid in the group shot two photos up (pink, black, and gray embroidery floss).
You lot can also make up your ain patterns, y'all don't have to use the ones in the booklet! Exercise follow the booklet to see which slots to use for loading bobbins, though, or the machine might jam upwards. Meet my Hack #one below on making your own color-patterns.
You can also use Craft Pattern Online's Kongoh complect design generator to plan color-patterns. This independent site is a great resources for complect pattern generators. On their Kongoh planner folio, use the 'minus' icon to bring the number of strands downward from 16 to 12, option a color from the color wheel, and start designing! (Side note: Craft Pattern Online is also a great resource for converting uploaded images into customized gridded patterns – great for planning needlepoint, cross-stitch, crochet or even pointillist or "paint-by-numbers" images).
Note one: Using a Kongoh chart
A standard Kongoh nautical chart like the one on CraftDesignOnline does not marshal exactly with the starting prepare-up of spools on the machine, and the fiddling circular KumiKreator design charts. I added all the numbers into the pics below to show how a normal Kongoh nautical chart can be used with the Kumi machine (the real KumiKreator blueprint charts are not numbered.) You wouldn't go the Dream Axle pattern if you started by loading color #2 of the Kongoh chart into spot #1 in the automobile, even if the residuum of the colors follow in the right order.

In starting position (shown above right), spool no. 2 will be the first spool to move down once yous showtime cranking. (spool no. eight will exist the first to motility upward).
Notation 2: Jams
(If you have a jam, exist certain to besides see tip #2 further down.)
There are two ways the machine tin can jam upward and stop functioning. Both seem to be caused by loading the machine incorrectly, and they stopped happening once I got the hang of the set up-up.
A. Thread jam A thread may exist tangled or stuck – check each spool to come across if its thread has gotten stuck onto the side of the spool, or around some other spool-holder.
Untangle the thread, but likewise gear up what acquired information technology. Information technology probably happened because you didn't (successfully) release the white arm before you started cranking, so the growing braid wasn't being pulled upwards. Before you lot start cranking, you must button the white tab to a higher place the prune frontward and firmly downwards to release the white arm. Another possibility is that yous didn't insert the spool correctly into the spool-holder, or thread the stop of each strand up THROUGH the spool-holder, or tighten up on all the spools before yous started cranking. (again, see tip #2 below!)
B. Mechanical jam, a.yard.a. "Spool-holder jam" A spool-holder might inexplicably be occupying a slot that should exist vacant, thereby blocking the side by side spool-holder from entering its proper slot. This can happen if you commencement loading the machine without paying attention to the setup directions, and happen to put a spool into the wrong slot (see the following two tips). Examination to see if it'south this type of jam past pulling all the thread from the spools – eliminating the possibility of a thread jam. If the crank still won't turn, then it this mechanical jam. This has merely happened to me once, and luckily I had already saved a link to the online video that shows how to set up this. (that link is too listed in the directions that come with the auto). The video shows how to access and remove the 'illegal' spool-holder and supersede information technology into its proper slot (you tin't but stick it into any visible vacant slot – the video shows how to find the right one).
Tips and hacks:
Note: See more tips and ideas from readers below this post!
Tip/ Hack i:
Make your own patterns:
Yous don't have to follow the colors of the pattern charts.
Yous or your child tin make upwardly your own patterns by loading any colors yous desire into the viii or the 12 slots shown on the charts in the booklet. As e'er, earlier inserting any spools, crank until the ii bluish slots are at "12 o'clock" and "half-dozen o'clock" and get out those slots empty. Loading spools into those slots, or starting with the blue slots not at the highest and lowest points, could result in a mechanical jam (see above). Loading into other slots than the 8 (or 12) shown in the booklet might outcome in a twisted muddle of threads rather than a truthful complect (ask me how I know!).
Tip 2:
Follow the directions:
Probably goes without saying, but be sure to read the set-up instructions and/or watch 1 of the several official youtube videos demoing them (same link), while pausing it to finish each step.
There is a sure corporeality of scuttlebutt around the web that this toy "doesn't piece of work" "is crap" "jammed up the first time we used information technology!" "worked at kickoff and so it got stuck and my daughter is heartbroken!" – simply because toy or not, this is a real braiding machine and has to be set up correctly in guild to work. Jam-ups are fixable (run into Jams above) and generally a outcome of misuse, so they stop occurring after y'all learn how to apply the automobile. The start fourth dimension I used it I found I had to get over the directions slowly and carefully, step by footstep, while following them – when I tried to just sentinel the video through first, and and so exercise the set-up information technology turned out I had missed some important bits of info.
After you learn how to load the car correctly, and teach your child, aye, it will be easy for both of you, but the showtime fourth dimension it might not. Especially if a spool-holder happens to be in the wrong spot from the outset. (If the handle won't plow even when no thread is in the spool holders, go to "mechanical jam" above.) Once again, all children will need adult help the offset few or several times in setting upwardly the spools for braiding and in finishing off the ends. Children nether nine will probable always need adult help with this, but will enjoy cranking out the complect.
Tip/ Hack 3:
Using your ain thread (run across my own experiments further up):
Kumikreator thread is thick, plus has a slight extra thickening at the tip that keeps it from sliding out of the white clip. When using my ain thread, especially if it is fine or slippery: After winding the thread onto the spools, loading the spools into the spool-holders, and threading the ends upwardly through each spool-holder, I then tie all the strands together at the summit into a knot. That knot serves as a handy crash-land to anchor the ends to a higher place the clip and prevent them from sliding out of the clip. (This might not be necessary with thicker thread, like size 3 crochet cotton wool). I load the threads into the white clip, with the knot to a higher place the prune. Subsequently that, I tug gently downwardly on the threads so the knot snugs downward confronting the acme of the clip. Then I tighten away whatsoever looseness in the strands leading up to the prune: I rotate all the spools 'backward' to tighten them upwardly (this is ane of the steps in the set-upward instructions, good to do every time before you lot start cranking).
Tip/ Hack iv:
Hack the length:
You are not limited by the length of the white arm! The limiting cistron for length is the amount of thread you can load onto the spools, non the length of the white arm. The Kumikreator automobile can braid longer lengths – for necklaces, shoelaces, or drawstrings – if you lot air current thinner thread onto the spools. When making a long braid, once the arm has pulled all the way back (maybe a ten-inch braid), you can simply re-attach the white clip farther downwards the braid, and continue cranking. Nevertheless the white clip is sized to grip onto strands, not fully-formed braids, and might break off or become likewise loose if yous force a fat round braid into it. To avoid breaking the clip: After the arm has pulled all the mode dorsum the offset time, if I am making a longer braid I then hang the finished function of braid from the clip: I suspend a small lasso-like noose around the braid, and hang the noose from the clip, sliding it further down the complect when the arm has pulled dorsum as far as it can get. See photos below.
[Update: I accept now seen some online complaints about this piddling white clip breaking off. If it does break, I believe the motorcar tin can withal be used if you lot simply tie the meridian of each braid onto the tip of the white arm.]
You can even braid up to twice equally long as your 'longest' possible braid! This requires loading the thread onto the spools twice. Measure and cut a strand for each spool that is twice every bit long equally the longest length you can wind on. Current of air from 1 finish onto a spool until it is full, and get out that aforementioned amount of extra length hanging off the spool. (To prevent a tangled mess, I temporarily bundle all those long extra lengths together until they volition exist braided.) Start braiding at the midpoint of the strands, and braid til the spools run out of thread. Then thread the other long (unbraided) ends DOWN through the spool-holders of the automobile. If you want the same color-pattern, you should arrange the colors into the same circular set-upwards yous used for the first half of the complect. After they are threaded down through the spool-holders you lot then wind them onto the empty spools. When the spools are all wound, insert them into the spool-holders. Use a string to append the already-braided portion from the white clip (as shown in photo below). Tighten each spool to remove whatsoever slack from the threads, and start cranking once again to braid in the opposite management from the first one-half, until the spools run out of thread for the second half of the braid. This can create a very long complect, up to 3.5 or more yards (3m or more than) for embroidery floss, less for thicker thread. (I described how I did this above in the review as well, including some things to watch out for – check higher up for more details.)
Bear in heed that any complect volition always end up much shorter than the strands you start with. That'due south because the strands travel from side-to-side inside the braid, not straight downwardly. The finished braid may exist less than half the length of the strands you started with.
Another mode to make a necklace-length braid is shown on a French crafter'south site – encounter link at the lesser of this page. She makes two bracelet-length braids and attaches them together with a decorative pendant at the join. Kids could as well only connect two or more than bracelets together past their plastic clasps into one big necklace.
Tip 5:
Tension: The tension is set by the spring-loaded white arm, and the resistance of the spools. Even and so, there's a learning curve with this! My first floss samples had loose gappy threads nearly the showtime, now I tighten everything up very carefully before I start cranking.
It would exist theoretically possible to featherbed the white arm and rig upwards your own simple weighted organisation. If you desire a tighter braid you would apply a lighter upward pull. About natural fiber (cotton, wool, linen) braids plump upwards, relax, and look better subsequently washing them gently in hot soapy h2o, actually helps fifty-fifty out slight tensioning issues. Overall, I've been impressed with the relative even-ness of the tension in the braids I've been churning out. My pics bear witness most of them – I don't have a pile of "Dorian Grayness" terrible ones hiding in a drawer!

In-progress silk complect looped onto clip

Braiding machine history and resources:
The get-go braiding machine patent is usually credited to Thomas Walford (apparently of Manchester, England) in 1748. He got another braiding machine patent in 1777.
In 1767 the get-go metal braiding auto was made in Germany.
Various types of braiding machines followed, but as far as I understand they were all based on the same blazon of mechanism that is still the main type of machinery in braiding machines today – horn gears. Co-ordinate to the Maison des Tresses et Lacets website, the 'definitive version' (fabricated of wood) was congenital by someone in Normandy named Perrault in 1783.
Jean-François Richard-Chambovet brought these Perrault braiding machines to Saint-Chamond, France (near where the Maison des Tresses et Lacets is today) in 1807. That link goes to a bright account of how he happened to exercise that – it's the starting page of a book virtually the effect of industrialization on family and social life in Saint-Chamond, with lots of information nigh the braiding and ribbon-weaving industries there.
The Transmission of Braiding by Noémi Speiser includes a section about industrial braiding machines, including their history.
Braiding: From Cordage to Composites, past Sree Shankhachur Roy and Prasad Potluri, Fabric Research Conference, 2016, Dhaka, Bangladesh. Well-written, concise technical overview / introduction to braids and braiding machines. PDF certificate (made available online by the University of Manchester – maybe but a coincidence, but Manchester U.K. was at the eye of the industrial revolution, which began with textile manufacturing)
Braiding Technology for Textiles – Principles, Design and Processes, by Yordan Kyosev, 2014. This seems to be the standard textbook on the nuts of industrial braiding technology. It is very detailed, definitely simply for true complect and braiding machine geeks! I haven't seen the whole book, just some of the parts that you can preview (in 2 unlike formats) online, only I recollect this would be an astonishing resource for current information equally opposed to historical. The paperback and e-book versions toll $140 (and that's the sale price!) non including shipping, but yous can also buy a pdf of a whole section (several capacity) for effectually $30 (click on the link that says "View on ScienceDirect" to purchase pdf's of individual sections or chapters). If instead you click on "google preview" it gives you a very generous portion to read – I gleaned some great tidbits I hadn't come across anywhere else. The same author has since published a 2d even bigger book covering advanced braiding engineering.
A brief but interesting reference I constitute online was in A&P Engineering (a U.South. braiding company) website's history pages:
1830'south – Henry Pearce comes over from England bringing his expertise in spinning and enabling the company to convert raw cotton into fabric. The visitor introduces its first braid production: Candlewicking.
[That was around the aforementioned time as the appointment on the cast iron braiding motorcar on display at Paradise Manufacturing plant! I wonder if Henry Pearce's candle-wicking braider was identical to information technology. This was in the days before electric lighting – lamp and candle-wicks must have been a huge demand back so. Before making this mail, I had never really thought of candle wicks as an important braided particular.]
Horn gears in braiding machines
The horn gear braiding motorcar was invented in the mid-1700's – pretty much the dawn of the industrial revolution – and yet it is still the most common type of braiding machine today!
From Wikipedia:
Braiding machines, although they have an credible complex movement of bobbins, are mechanically simple and robust.
The simplest possible braiding car has but 3 bobbins, circulated by ii horn gears, making a 3-strand braid – this brusk video clip shows the uncomplicated effigy-8 bobbin track and the developing braid. (Use your back button to render here from Youtube.)
Here'southward a fantastic video on Youtube from Andreas Siegler that clearly demonstrates exactly how the horn gears operate to propel a single 'dummy' bobbin-carrier around the undulating rail of a braiding machine: DIY Maypole Braider – How does information technology work? [he doesn't use the term "horn gears" – he calls them "gears with recesses"]
Hither he demo'south his machine loaded with all xvi bobbin-carriers, but with no yarn wound onto the bobbins: DIY Maypole braider – Quick review
And hither he shows its first actual braiding – making a hose-similar tubular complect effectually a bundle of wiring: DIY Maypole Braider – Braiding a wiring harness. This is exactly how wiring harnesses are braided in some industrial settings today, you can find other youtube videos in which workers are doing this exact blazon of braiding effectually bundles of wires – the worker holding and manipulating the braid around the wiring bundle just as Andreas is doing while the braid is being produced. In dissimilarity, braiding machines that make cords and bands are not assisted by any blazon of hand labor – diverse mechanical processes reel the cordage up onto large spools. (run across my video clips most the height of this page.)
Andreas Siegler has a series of videos about building this xvi-bobbin braiding machine (not a tutorial – no plans given), click on his proper name under the videos to get to his youtube channel.
Maypole braiding machines brand tubular braids, though a very slight blueprint modification allows them to make apartment braids, like the ones in the first video links to the Maison des Tresses et Lacets almost the get-go of my post.
Kumikreator braiding car mechanism – not horn gears:
Most commercial braiding machines operate by means of horn gears. The KumiKreator braider works past a very different (and inherently more clackety) mechanism that isn't as smoothen and efficient as horn gears, but it gets the job done for these Kongoh braids. You tin can meet only by looking down at the Kumikreator in action how the two geared "spool-transporters" circulate effectually the face up of the machine, each one ferrying a spool-holder from one side of the motorcar to the other, while the other spool-holders remain stationary. This in itself is quite unlike from how horn-gear machines function. In a horn-gear braiding machine, all the spool-holders (a.yard.a. bobbin-carriers) move in tandem – no spool-holders "expect" in place while others are moved.
You would have to remove the base of a KumiKreator braiding machine and peer in underneath at the mechanism in gild to run into how the inner all-plastic workings literally wedge a spool-holder up and out of a slot on 1 side of the circumvolve of spools; slide information technology into the slightly raised geared transporter; and drop it down into a new slot on the other side. This wedging up and dropping down of difficult plastic parts produces the loud clacking racket. This is completely different from the way horn gears operate (run across to a higher place). The patent for the KumiKreator refers to this as "elevation 1" and "elevation 2". (The patent information is new – I couldn't find any references to an invention or patent for the KumiKreator back in Feb 2019 when I first wrote this review – not surprising since the patent outcome engagement is Apr 2019!)
Here's a link – opens in a separate tab – to the U.S. patent for this KumiKreator machine. The patent is assigned to (owned by) Spin Primary Ltd (Canada), and Fuse London Ltd (UK), and lists the inventors every bit Brian Whitehead, Mollie B. Jameson, Herman Chan. Includes several drawings of the whole machine (in between the abstract and the main office of the text of the patent).
Information technology might seem sort of perverse for a loop braider to be fascinated by braiding machines, since it was the appearance of braiding machines that almost killed off loop braiding worldwide. Merely I call up hand braiding can coexist with machines in the modern world just like hand knitting, weaving, carpentry and other arts and crafts.
This little Kongoh braiding car is fun for me as a braider to play with, but it can merely brand one rather minimal type of complect, and other than picking and loading the colors, my hands only get to practice 1 repetitive and somewhat uncomfortable motion that is non soothing or graceful or "in the threads" similar hand braiding. One time I've run out of steam with this machine, I'll continue it effectually, but I will exist back to the much wider possibilities of braiding with loops on my fingers, and appreciating braiding machines from a distance!
Update 3/2/2019: I just ran into the blog of another adult KumiKreator user! (Or maybe she uses it together with her oldest daughter – my grasp of French is very rudimentary.) She is a French craftsperson and mother of two young children who has been using ribbon yarn with their KumiKreator machine. Click link for one stunning example. In this one, they created a pattern in simply i color, simply using a contrast of shiny vs. matte ribbon yarn.
For more, here's a link to just her posts tagged "kumihimo" – the first several pages are by and large of KumiKreator-made bracelets and necklaces. For ideas and inspiration keep clicking on successive pages when you get to the bottom of the starting time page. Some of the bracelets have a braided tassel attached with metal findings – a fun embellishment.
February-14-2019, last updated Oct-22-2020
© 2019-2020 Ingrid Crickmore
See full copyright restrictions and permissions at the bottom of the sidebar of each folio of this website.

How To Fix Kumi Cretor Jam Spools,
Source: https://loopbraider.com/2019/02/14/toy-braiding-machine/
Posted by: wilsonceshounce72.blogspot.com
0 Response to "How To Fix Kumi Cretor Jam Spools"
Post a Comment